Thursday, November 29, 2012

Enthusiasm, Bugs & Carrots

I've been back from the Convention in Armidale for a week now. This weekend I'll have to wash the car for a second time, bugs have a way of getting in everywhere! Not only that bug guts should be bottled as the perfect universal glue, they stick to everything.

The sessions had alot to offer, and as always I had the trusty notebook for anything that really meant something to me. This was my third convention and I continue to be surprised about how much I don't know. 

I got alot out of Ian Dunn's two sessions. Painting brass locos and research, two things I have very little knowledge about, and that is what was stopping me from doing more with my modelling. Now I can't wait to get on with airbrushing!  His techniques allayed some long held fears on my part. The main one being just how to successfully take apart a brass loco, paint it, then get it back together, working as well as it was before it's de-construction.  Paint prep and what paint to use were always questions left unanswered for a fair amount of time, till now.

 Thanks to Ian, a great teacher and communicator. I have found myself eager to start on some research into my home layout after being part of this. The what, when, where's are really having to be decided upon for me to move forward. Great stuff! I didn't have a chance to speak to you personally, so many thanks to you Ian I have learnt some very helpful ideas and pointers.
 Years ago I came across a photo of the above broken down old passenger wagon. I have a copy above my workbench (somewhere!) that I glance at for inspiration. In front of Laurie Green's display of his work in sideshow alley was the actual model. To  see Lauries' work in the real was a huge bonus for me, now I knew who's work I'd been admiring for so long, and I had a chance to let him know about it. What a modeller! 

 Geoff Nott and Michael Flack's layout 'Smuggler's Cove' is absolutely awash with detail! Their sessions were very condensed wanting to share as much as possible. Plenty of very practical ideas were shared about so many subjects.
 These two terraces were built by Grant McAdam. These were showing the detail that he gets into his masters, that then follows through to the models that he creates. The attention to detail, wow, amazing stuff. These two have individually painted bricks, and the tiles on the floors are also hand painted. Brings me back to living in Melbourne years ago!

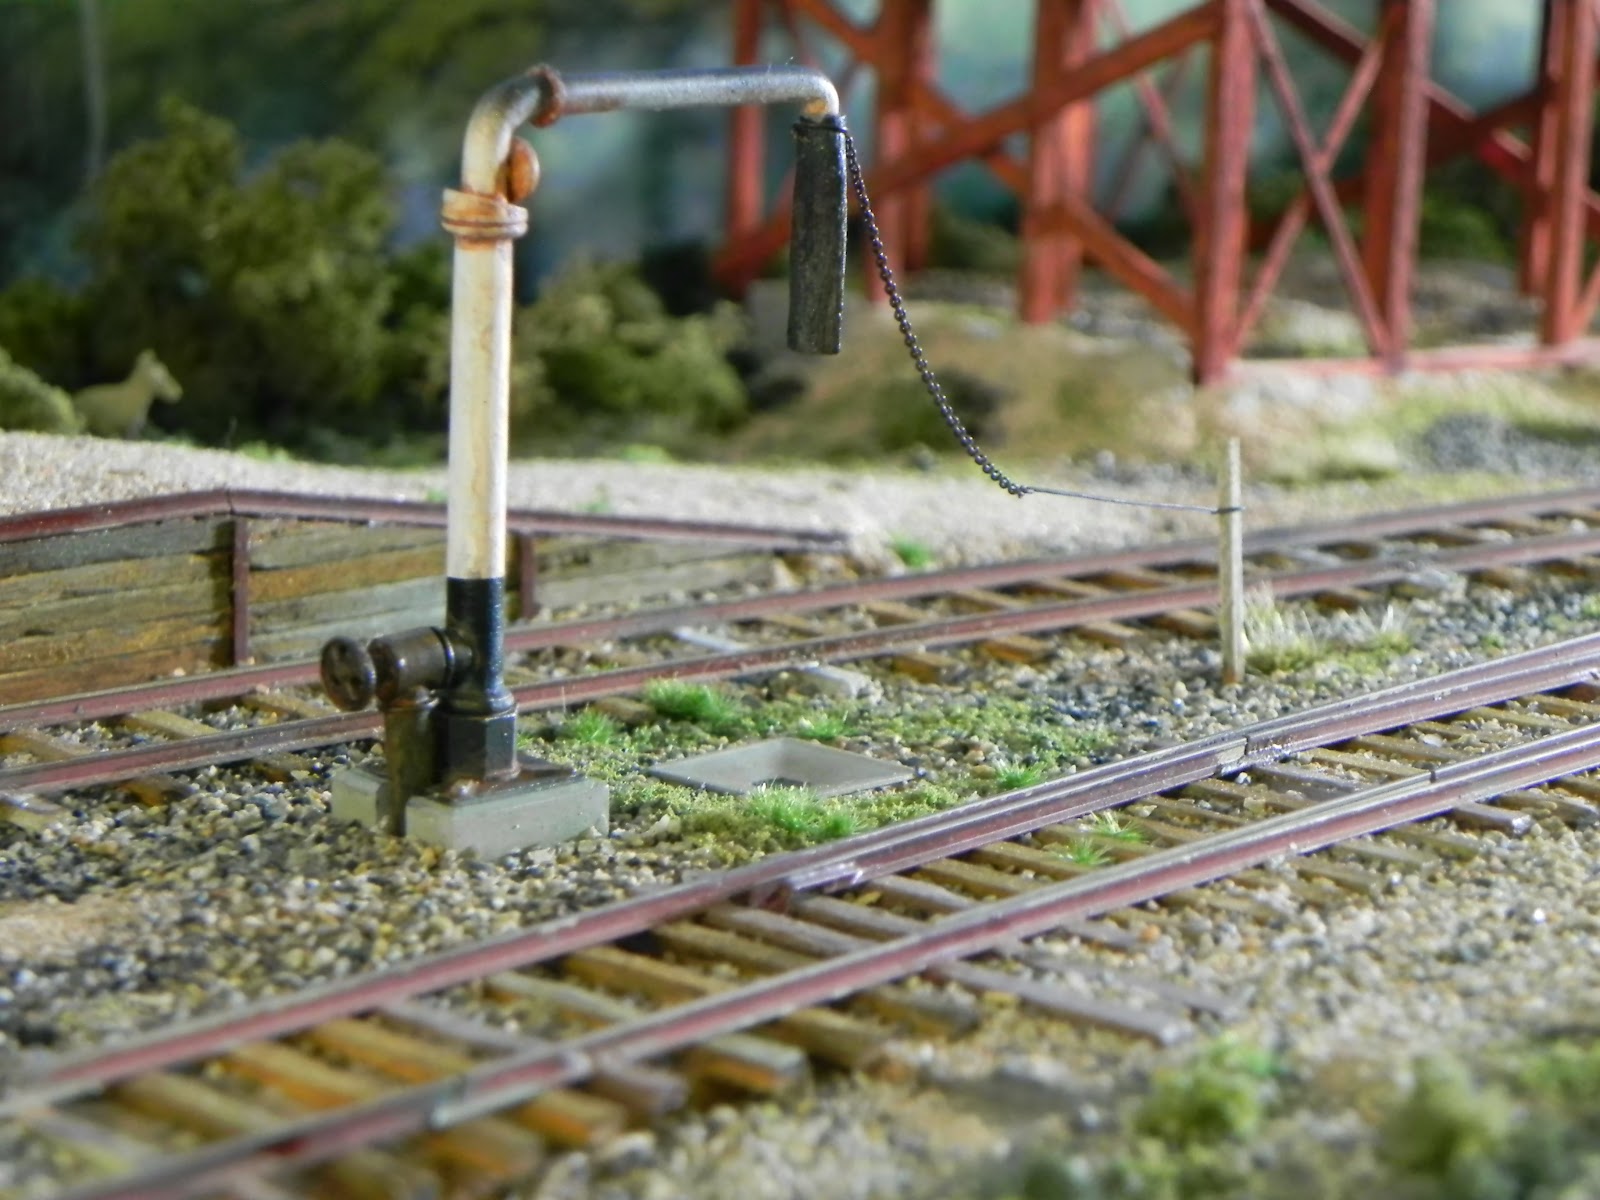
I was looking forward to Stephen Ottaways' session from when I found out about it. At the last convention he held a very informative session about rail inspection vehicles. I thoroughly enjoyed it, it was well researched, photographed, and presented. So this session had a lot to live up to Stephen! Gold star! It was great, hence all the photos we all took on the way home at Guyra, and Tenterfield stock races. I found the session to be plenty to get you interested, but had you wanting to find out more about your particular area of interest. Thank you Stephen.

The best part of the sessions overall is that the presenters get you started in a new technique or idea that you have to now pick up and run with. That is why I love these conventions, the enthusiasm it injects into modellers is almost visible! There are many of us still talking about sessions we saw years ago! So in short thank you to all of you who took the time in research, preparation, effort, & patience, to bring us to a new level of modelling.


 These four above photos are of the Guyra stockyards. We had to stop there on the way back home on Monday, fuelled with our new found knowledge of what to look for when taking some photos of record. The races appeared to be mostly for cattle, with the ability to be used for sheep also. How did I come to this conclusion? Well for those who were there it should be obvious, the height of the fences for a start. One thing we did notice was that all the yards had corners, and no man safe gaps in the fencing. What else can you see in the photos?
 Above is an overall view of the loading/unloading area with the sheep loading down the far end of the photo.
 The galvanised gate and the wooden two plank one appear to be retro fits over the man safe access at the point of the loading platform for cattle.
 These wooden gates were a completely different design to those seen at Guyra, maybe an earlier design?
 The unloading bank here took up quite a bit of space, with the sheep loading being separate and further south.
 Sheep loading platforms, quite away south of the rest.
This last shot is of the truck unloading race at the base of this whole area. The change in height of the trackwork was quite dramatic, used for gravity feeding the wagons. You can see the ballasted deck bridge in the background, probably not around for much longer after seeing many others already removed since our last trip south.

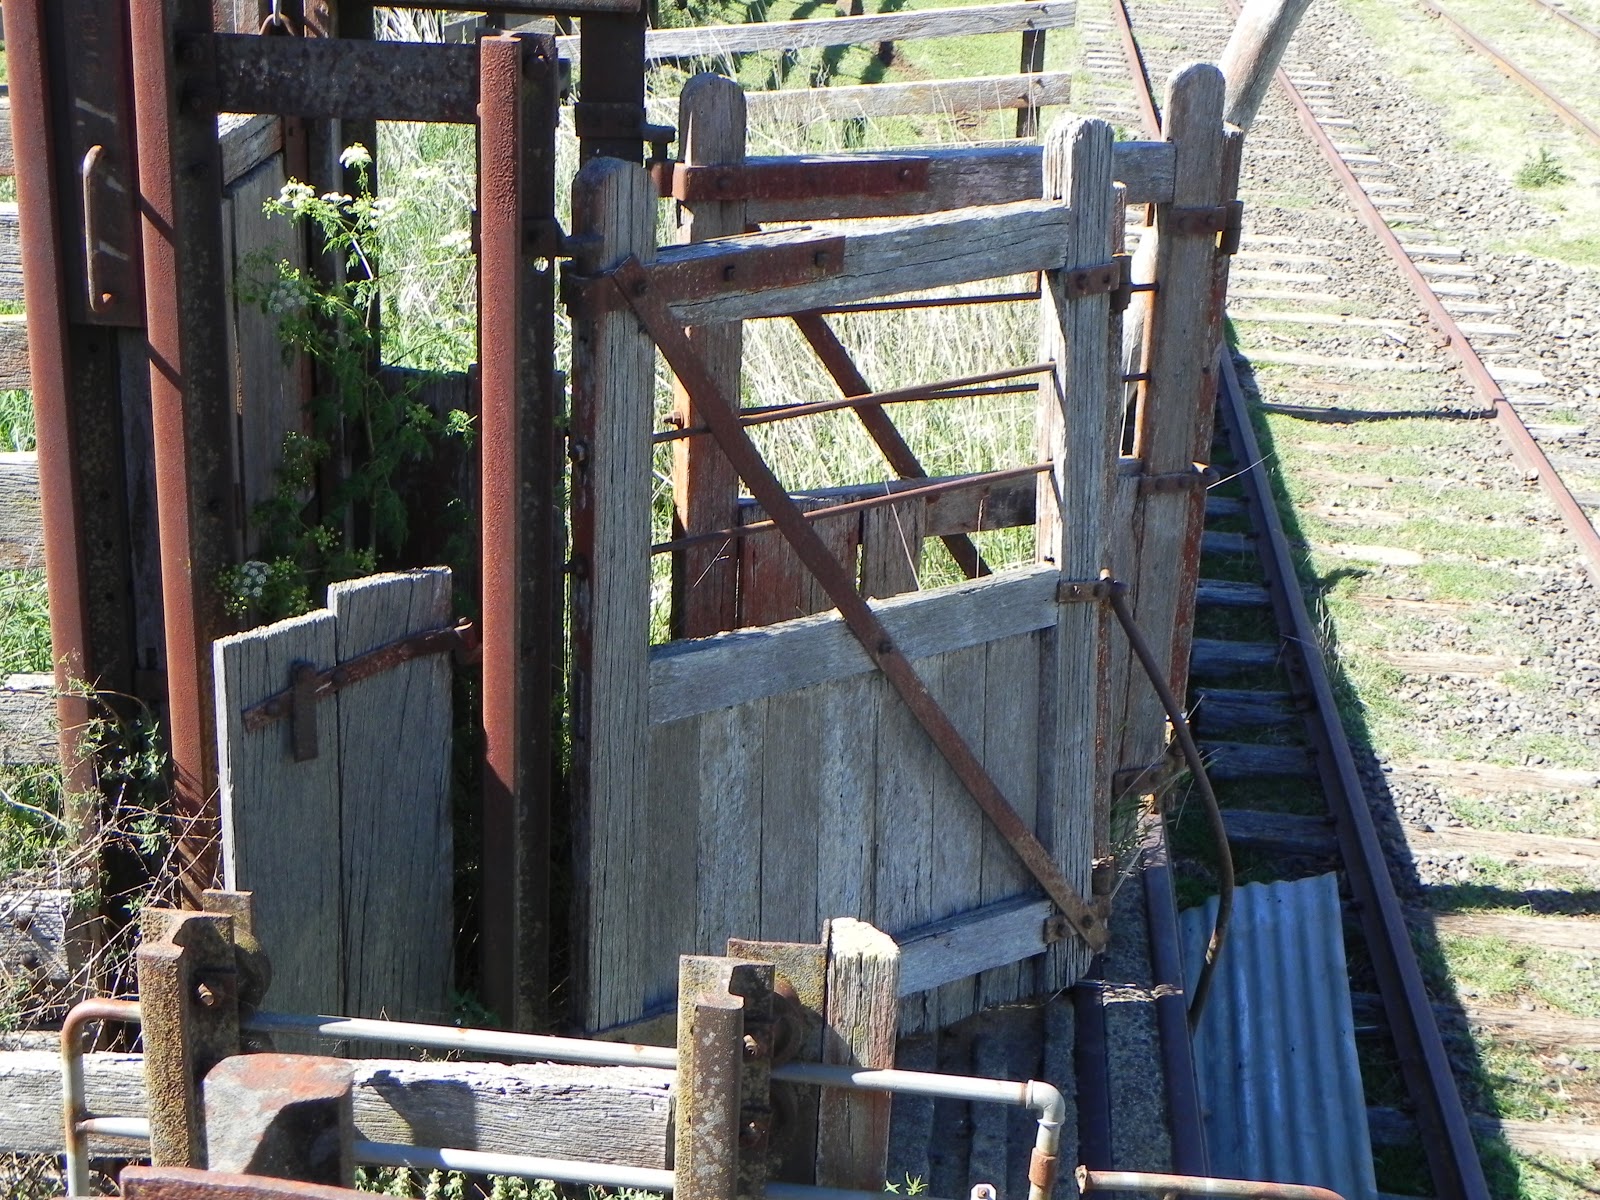
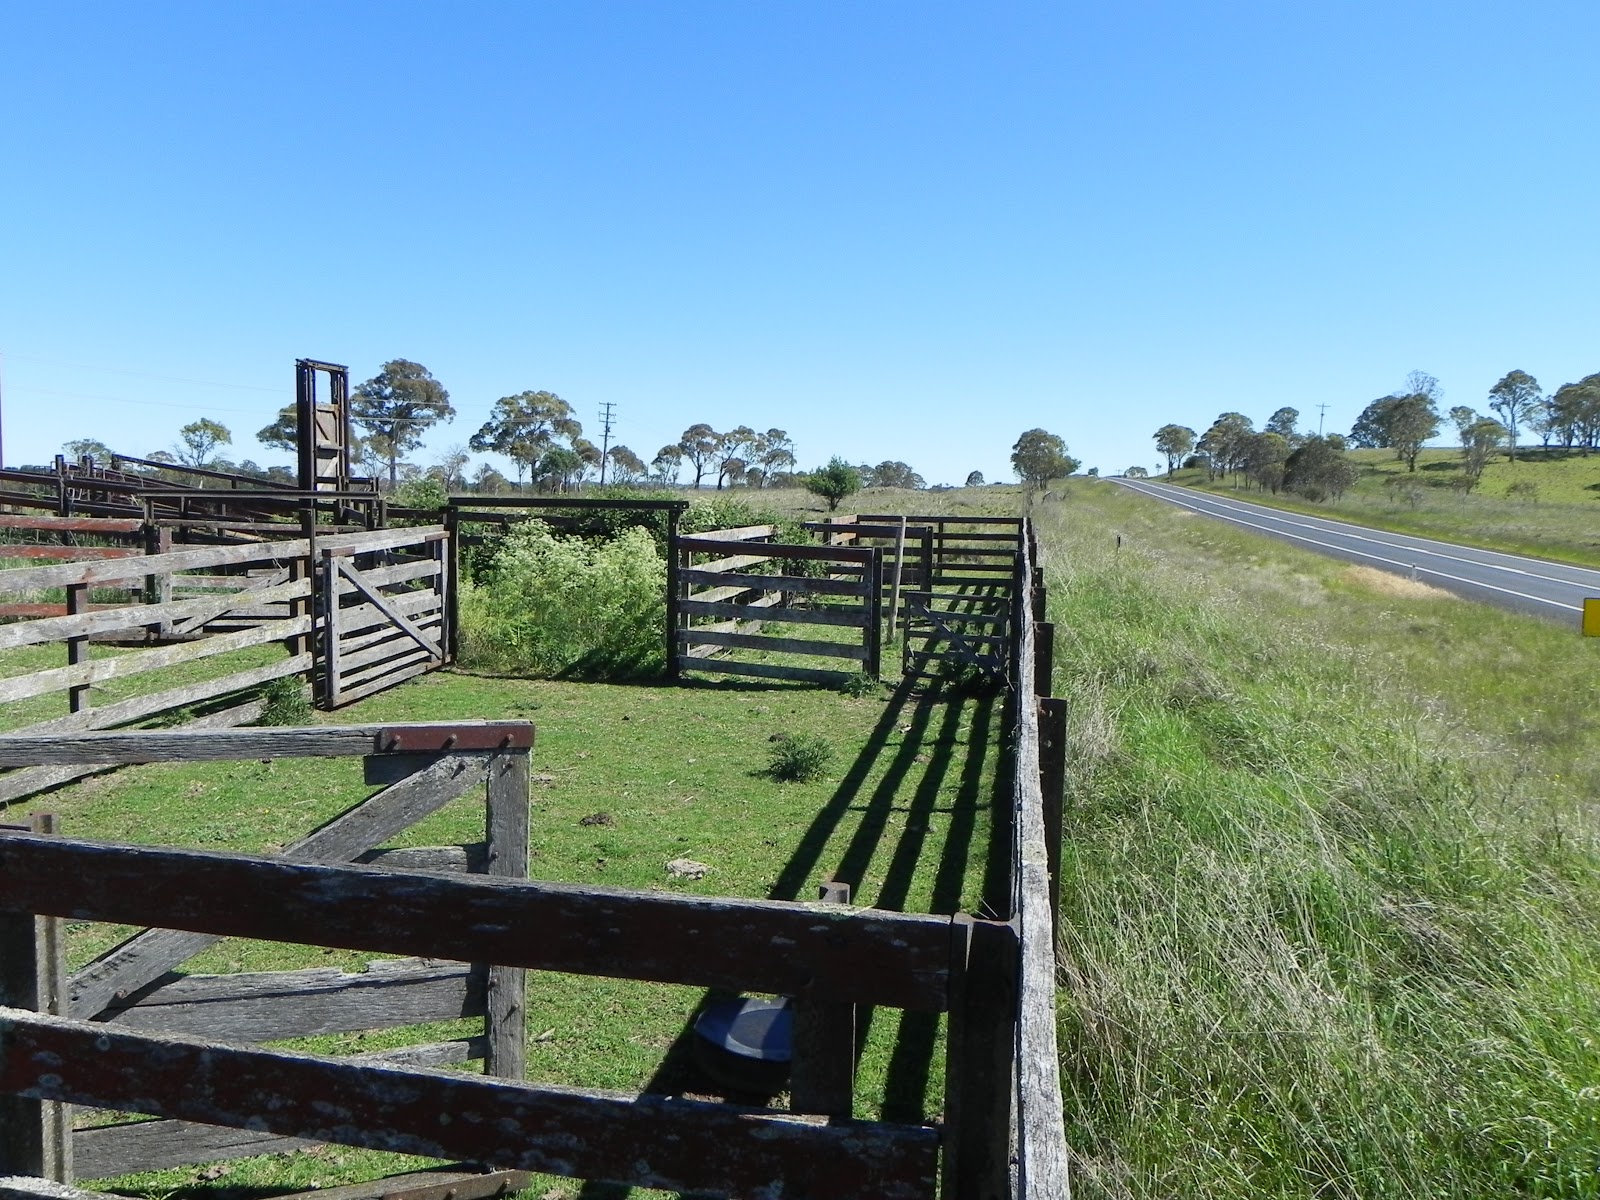
All these photos are of Tenterfield stockyards. What a great spot to stop. There were some really great opportunities for modelling  here. 

We were lucky enough to be asked to stop by at Rohan's place on the way north to view his layout 'Bolivia'. I have seen his layout at a couple of shows, but to see it up close! Well thank you Rohan for letting us all through your layout, and home. The cuppa and sandwiches were great. 

So carrots Geoff? Yep I simply meant that we were all a little like horses, being temped to move forward for that carrot that was being dangled out of reach. After all if we don't experience it ourselves we won't have ownership of an idea and run with it. I think there are many of use who will use this convention to go on and DO more with our modelling. So yeah carrots...

I was looking forward to this convention and I certainly wasn't disappointed. The New England Club are to be congratulated for their efforts, thank you. From my perspective, having the layout there, it was a humbling experience to be even asked to attend, thank you Warren. We had a great time, we were well fed, the meal Saturday night was beautiful, the beer was close by, and the company outstanding! 

Can't wait for the next one!
Oorroo!
Geoff. 

Monday, November 12, 2012

Evans' Gap Station surrounds

Time for a little bit of detail stuff this week. I've been trying to finish a bit around the station masters residence before this weekend. It's along way from finished to the way I'd like it, but it is on site at least. The chimney was a challenge to finish, whether because of the finish of the casting, or the application of the 'right' paint colour. In the end it had a couple of coats till I got it to where it is now. The red colour is alot better than the previous creme colour that i'd done it in.
 A couple of shots show around the water column and the siting of the Station Masters residence, with associated clutter. I still want to add a bit of detail beside the line, so it will be a busy next few days.

Well a quick update, so there you go. Have a great week, might see you Friday!
Oorroo! Geoff.

Sunday, November 4, 2012

A Weekly Update...is my name Craig?

Sundays bring on relaxing hours with family, then late in the day an update from Craig! He's just been so consistent, regular and informative. I post about as regularly as the moon is full, well maybe I'm a werewolf and I just haven't realised it yet. It is great to have something to look forward to, so Craig my hat is off to you! Seriously! (H says my hair is off as well!)

So what is is this post about? I'm not sure really. I've had a fair bit of time outside today so I've finished the LED's on the layout. They've come up pretty well actually, and so much lighter to carry about when I'm moving the layout about.

In a couple of weeks we'll be off to the Armidale Convention, held by the New England Club. It is certainly looking like being a great event, with some great subjects and lectures to be involved in. The event has been run for a fair while now, this will be my third. I have enjoyed over that time meeting some just brilliant people, great modellers, and just fantastic blokes! 

My first one was at Ebor in NSW, I was a complete beginner, and was a walking sponge. There were several speakers that really had a great impact on me, the first was Ian Millard. Ian's approach to getting his modelling as close as possible to the real thing had a huge impact on what I was and am trying to achieve. It really is still today a great motivating force for me, so thank you Ian.

Then at Ebor was a session about electronics, and Marcus really had a captive audience. The ideas he planted are still providing me with ideas and reasons for doing more with my modelling.

The convention, no matter which one I've been to have been, informative, enjoyable, and worth the travel time to get there! I'm sure i'm not the only one wanting to find out how to paint my locos better, how to build a better bridge, or even how to get into On30, or what about modelling stockyards, I haven't begun mine as I'm waiting to see this first!

Now this next week is all about ensuring I've got the last minute jobs done, packed everything, and of course I'm looking forward to Craig's post next Sunday night!

Have a great week, and hope to catch up with you in Armidale!

Oorroo, Geoff.

Sunday, October 7, 2012

Station Masters Residence - update

The painting and finishing of a model spells the end of a project, and for me it's the part I like the least. The risk of stuffing up a project that you've been working on for ages has me feeling a little bit tense. The weather is a bit warm today, hot and not real humid so perfect for splashing some paint on the Stationmasters' home. 

I've used the tamiya undercoat as I really like the finish of this paint without having to apply too much paint. Then on with the topcoat of a stone like colour (tamiya spray TS-68 wooden deck tan). Not a bad look. I've added some of the trim paint, but this will need another coat. 
 The corro is yet to go on along with the last of the trim. I've cleared the spot where the house is to go and I'm thinking of reworking the profile of the landscape immediately in front of the house. I'd just like to drop that hump down a bit that you can see in the second photo.
The palm trees are new, but not where they'll end up, just had to put them somewhere. You can see in the second photo the location of the house in relation to the station building, then opposite is the goods shed spot, but that's a whole other post! 
Have a great week, Oorroo!
Geoff.

Thursday, September 27, 2012

Station Masters Residence

Evans Gap with its limited passenger service, but extensive goods traffic, had a modest NSWGR residence for its Station Master. It was located near the station building itself, but due to the lack of a suitably sized building sites the building had no road access. The families that were housed there had to transport all their goods by hand or luggage trolley across the line from the goods shed.

The design is a standard NSWGR one, I just need to double check the stocks of clapboard to see that I have enough, of course the one I want I don't have any of. Damn it I'll just have to head to the Model shop...heh heh heh!

 Here are a few progress shots to let you know what I've done so far. You can see in these two photos the area out back of the building with the kitchen with the door partially opened and the open wash house. The first shot is without the roof, and the second with the roof on and the verandah detail on as well. These were a bit fiddly but I'm happy with how it works now it's together. The spot to the right of the doorway of the main house with the flat spot cut in is to locate the chimney against. I'll add that later once it's been painted.
 The tape holding the roof is to hold it in place while I glue the other detail bits to it. You can't see it but there is an internal wall that is attached to the roof that is located in the right spot by some channels I've glued to the inside of the walls. All that is is done so I can paint it separately then put it together easily afterwards. This side of the building is the main side that you will see once it's on the layout, so you'll see the wash house and kitchen areas easily.
 Here you can see the ridge cap the corro iron fits up to this once the house is painted. I paint the iron separately then weather it once it's in place.

To the left of the wash house there is the outhouse to go, I've built that one separately.
Anyway there you go, not far from painting now,
Oorroo!
Geoff.

Sunday, September 9, 2012

Bit of a catch up!

Well it's been a while since the last post and the busy month of August is well behind me. I've had time for a little modelling, and fussing about with some LED's for layout lighting. Daz and I had two shows, Murwillumbah and RMCQ's as well. 

Phil and the rest of the crew at M'bah run a great show, but unfortunately this was Phil's last show. The show has a reputation of being worth a look at and a privilege to be invited to. I was lucky enough to be invited along with Splitters, and it really was a hoot! The show is contained in the main hall with a great variety of layouts to view, and this year was no exception. Everyone involved seemed to have a good time, and the general public circled throughout the weekend, many for several hours. 

The school P & C do a great job, and the ladies in the school canteen deserve special mention for feeding us so well over the weekend. There were many familiar faces, that I must admit I really do enjoy catching up with during a show. So many people in this hobby are there for a chat, or some advice, and it is well intentioned and honest. It would be great to be a part of another show, but things change, people move forward, and I do wish Phil all the best in the future, happy modelling!


 RMCQ had their show as well two weeks after M'bah. Daz and I had a modelling weekend for a change. I was really surprised at how much I managed to get through, even though I spent a fair bit of time having a chat. The RMCQ club run a well organised event, in a great venue. We stayed at their clubhouse as well, and that really saves on the travel time and expenses. Their clubhouse is a credit to them, well organised and HUGE! 

                                   
 At home now I've been messing about with LED's for the layout. I want to keep the modules light, and have an even light. I have purchased some LED's from E-bay at a reasonable price. I've put a couple of photos in to show what I purchased. I do need to thank Col Hussey and Darryl Dilger for taking the time to E-mail me with the lights that they use, and where to get them, they set me off on the right track that's for sure. The LED's are backed with 3M tape, and I've mounted them on corflute sheets. I've used a single row of each of the colours I have. I'm quite happy with how it looks. 
The modelling bench is unpacked now, with the goods shed and station masters house left out to finish off. The more I use styrene the more I like it. The station masters house is coming on pretty well. The speed you can work at because of the gluing time is surprising!

Well there you go, that will do for now. Next time I'll be a little more specific,
Oorroo!
Geoff.

Monday, August 20, 2012

RMCQ Show 25-26th August


This coming weekend the club out at Bald Hills is holding their annual show. Daz and I have been along to this one with Splitters, and it is a hoot! The venue is at the Strathpine Community Centre, 199 Gympie Rd, (enter off Mecklem Str), and open on the Sat 9-5pm, and Sun 9-4pm. This is a fantastic venue, plenty of room, plenty of light, and dust free! A modellers dream!

The RMCQ club is full of a great group of people who apart from being great modellers, are a real nice bunch. We have been lucky enough to have been a part of this show previously and at the last minute we've been included to run a modelling demo for the weekend. Now the hard decision is what to take along? Buildings, trackwork, kits, scratchbuilt wagons? No doubt I'll bring more than I need, but it should be a busy weekend.

 So look out for Daz and I on a couple of tables squeezed in amongst the layouts! Pull up a chair and have a chat. Have a look at what we're up to, and ask all about it. After all that's what we're there for!

Oorroo! Geoff.

Wednesday, August 8, 2012

GB1 Goods Shed pt2

I had a change of plan with the goods shed after the May show. I had decided to build the three visible sides of the shed as timber frames clad in corro, with the fourth side actually having a core of balsa and the cladding put on both sides of it. I thought that the forth side needed to be stronger to support the other three 'flimsy' ones.

At the May show I had 90% finished the dummy side...but, it really looked oversized and was creating its own set of issues as far as how best to mask that it was over a scale foot thick. So then it was cast aside and a new side constructed the same as the other three, much better. Once the corro is put on the framing the whole thing seems stronger, certainly able to support it's own weight.
 As is normal for me towards the end of a deadline there is a flurry of activity. That's probably a good thing otherwise I'm not sure I'd get much modelling done at all! So with the Murwillumbah Show coming up in just a few days there has been a last minute push to complete this project. As you can see in the photos the four walls are together. There are a few corners to tidy up with the cladding, then they're done. 
 The roof beams are next, then the roof cladding. Almost done!
I'm leaving a couple of sheets of corro off like the shed is having some maintanence done. I guess you'll have to come to the show to see if I managed to finish or not!

That's really it, see you on the weekend if you come to the show,
Oorroo!
Geoff.

Sunday, August 5, 2012

What to do next weekend?

 Of course there's time to take photos! Even on a Sunday morning before the show opens! Hey Daz!
 I'm not even sure all these facilities even exist now, certainly the top photo of the loading shed has been 'removed'.

For those of you who need some help filling up your modelling calendar may suggest heading to a Model Railway Show next weekend? Murwillumbah State High School is holding their model railway show on the 11th and 12th of August, at the Elliot Centre, Nullum Str Murwillumbah, Sat 9-5pm and Sun 9-4pm.

The Show is run by the high schools P&C every two years. Daz and I have been before to present 'More', Daz's layout, currently mothballed whilst he focuses on his home layout. I must say that Phil and the rest of the volunteers made us feel very welcome, and the event ran like clockwork.

I like the variety of layouts that this show attracts and there is always something new to see. The shopfronts are many and there is always a new product to be found! If you can make the trip you won't be disappointed I'm sure, and make sure you come on over for a chat!

Well now it's all about getting the trailer packed, and heading down south for a training weekend as H calls them, hope to see you, have a good week,
Oorroo!
Geoff.

Thursday, July 26, 2012

Lattice post home signal construction

Black Mountain signal post, just beaut! 

SSC has only a small yard, certainly busy, but limited in its size. Evans Gap relies on  the deliveries from Sydney and beyond to survive. Those deliveries were required on a fairly regularly cycle, so effective safe working was the order of the day. At either end of the yard were home signals, and further on a landmark for early warning of the yard ahead.


What seems like years ago I placed an order with Wizard Models in the UK for some signalling bits that I needed urgently. (yep two years ago I'd say!) I really liked the look of their lattice post, and thought I might be able to get away with a smaller OO sized post (it would be great to have a local supply of lattice posts). I also picked up a couple of detail bits at the May Show last year, a lamp holding staffer and some white metal lamps as well. The intention being to light the lamp with an LED and also light the lamp that is being carried.


I've shortened the post and added a new base, and the NSWGR finials by AM Models fit the top spot on! I've re-aquainted myself with Ian Millard's fine article in AJRM on signal post construction. The ladder construction was not difficult, but a little time consuming. The hardest part for me was not adding too much solder to each step so that there was little or no fillet between the steps and the stiles. I did cut two pieces of basswood to fit between the stiles against the steps. one against each side of the steps so that filing of the stiles was a little easier.
 The lattice post being OO means that the holes for mounting the moving parts of the signal are not perfect, however it will have to do. I've soldered a new support for the weight through the centre of the post, and added the signal arm support on the side of the post as in Ian's article.
 I used a block of timber with a centre line marked and a squared line to help aligning the signal arm support tube. Here's a close up of the top of the signal so far. 


Whilst out at my local hobby store the other day I mentioned to Chris at Daft Craft the fact that the figure I was using lacked detail and looked a little 2D. He showed me some figures he produces for wargamming, in a word outstanding! The level of detail left me a little in awe, of course I told him to have a crack at some HO stuff. During the conversation we spoke about modelling putties, so I've got some Milliput to bulk out my figure a little, and maybe add some detail...we'll see. 


Well it's not as easy as I thought it would be. I've managed to form some extra backbone that my 'bloke' really needed, but I'm going to have to wait till it's cured before adding any real shape. The putty I used is the yellow and grey all purpose one and I'm thinking that the finer one might be easier to work into another surface.


Well it's late and the coffee cup is empty, so that's it for a quick post,
Oorroo!
Geoff.

Thursday, July 19, 2012

It's Winter! So it must be time for snow...

Daily checks of the snow reports in the ski season are not an uncommon in our house during winter (H just loves it!). However it would seem that there's been a little bit of the white stuff falling about south of Brisbane.


Yep it's finally happening, the 'other side' of the layout is getting a bit of a makeover. The stress of falling rollingstock through the very large gaps between the ply was having a definite impact on those of us running on SSC. Then there is the issue of elbows and the like, mostly from obliging strangers who made it passed the barrier. I love their enthusiasm! I mean that, no sarcasm here! No, really! If the public are that keen to have a look then I'll make room, just not for their hands or elbows!


OK as I was saying, I've been doing some basic scenery work with the first layer of sculptamold going down a couple of weeks ago. Darren popped by last week and we had a bit of discussion about what goes where, and to that end we very definitely have a spot for a couple of buildings, timber mill, and even and old Shay. Daz suggested a road that linked the areas of the layout together, great idea! 
This end will be where the timber mill is located.


 With the ideas fresh in my mind I set about carving up the scenery to add a road. It adds a little bit more to the scene and gives the locals a way to get about town as well. I'll need to do a little more sculpting of the back scene to mask the roadway a little.


 I've added some rocks, not finished yet as there will be a few set into the area around the school, near the creek, hopefully tying the scenes together. I like rock work with defined edges as I find them easier to paint, giving a good contrast to the rest of the scenery. 


The second lever frame is together ready to be installed. The modratec kits go together easily, just a little fiddly with the ball bearings, but not hard work. There is a spot towards the town for it to go, same height as the other one which does seem to keep it out of the way, certainly it doesn't dominate the scene.
 A larger view of the immediate area, also shows the location of the derelict Shay  on the bottom left of the photo, with the timber mill behind.

Just adding some contours has changed the look entirely and made it safer to run a loco on as well! The scenery certainly is the easy part of layout construction and probably my favourite part also.
 This view at track height shows the location of the second lever frame in the foreground, looking towards the Mill.
Closer to the Mill with a look at the rock work to be painted. It's location screens the curve of the track when viewing from the creek end of the layout.

That'll do for a quick update, so you know I have been doing something!

Oorroo!
Geoff.

Wednesday, July 4, 2012

Tree modelling

The paste has dried, so on with the paint! I put on a light undercoat spray, then on with the tamiya and games workshop paint. Here they are listed in the order I painted them:


XF-22 rlm grey,           over the whole tree as a base, thin with a few drops of isocol
61-19 vermin brown    mix this,
61-81 graveyard earth  with this,  for an earthy tone for around the roots, and bark
XF-76 grey green         a lighter hand with this, bit of a dry brush to bring out the bark
61-54 skull white          just a light dry brush, highlights only though
61-75 black ink            let the rest cure overnight, just to highlight the deep, shadowed parts


(nb. as I've noted later, do the ink before the last white dry brush, confused?)


The paint I have has thickened a bit, so I do thin it to 'milky'. Something I didn't write in the last post. For a first go using the acrylic paste I'm pretty happy with  how it's come out, the paste can be worked a little as it dries so that you can add some texture if you like. The first coat of paste takes a bit of working to get it to stay where you want it. I found that if you put on a thin first coat, the second one will take a lot more on it to bulk it up.  


These photos show the trunk before I've added the foliage. I like the texture I was able to work into the bark. The paste makes it fairly simple to make it smooth also, it just depends on how much you brush it as it dries. I did add a little black ink, then I remembered from last time I used it, to make sure I did the white dry brush after the ink, not before...bugger!


Here it is with the foliage added.  It's pretty quick when you get to putting the 'leaves' on. Not too bad, just gotta get a spot on the layout to put it. That'll do for now,
Oorroo, Geoff.