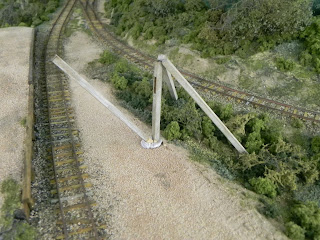
The yard area is small at Evans' Gap, so the locals had to be smart about how they set it up for use. Beside the goods shed there is a second crane, and the first one constructed is similar to the photo taken above. Unfortunately the original crane has been decommissioned, so the model on SSC is the only 'proof' that a crane like this one actually existed on the site.
The crane is basically basswood with white metal detail parts. The fret that Peter gave me will provide a much finer gearbox, and should help detail the crane nicely. Ages ago when I built a buffer stop out of basswood I stained the timber first then painted it, and then sanded and stressed the paint so that some of the timber was bare. I've done the same for the timber work here, the key is to allow the stain to completely cure befor adding the paint, then let the paint cure j as well. I state cure as dry is a completely different state, as there is still moisture in the paint for days. I use acrylics and I've found in the humid atmosphere up here that it can be 5-7 days before the paint has cured enough to sand it without it coming off in clumps as you sand it to strip off the peeling off paint to expose the timber beneath.
The model is from Alexander Scale Models, nice laser cut timber, and white metal detail parts, that do require a little clean up. The only issue with the kit is the lack of detail in associating the parts with where they go on the model. The line drawing only identifies the part name, but does not clearly show the part so you know what and where each part goes. The company that produces the kit tells me that the instructions contained are all there is, most helpful.
Here's a photo of the laid out parts that might make it easier for those who want to build one.
I sprayed all the whitemetal with undercoat, then a nice rust colour on top. The pulleys in the kit are a bit coarse, well actually a bit more than coarse. So into the parts box I dove and came up with some pulleys from AndIan Models, nice. As I said earlier, I have a fret from Peter Boorman that will make up a nice gearbox. I just need to modify how this will all work to fit together.
Now that all the timber is weathered, I'll take a moment to mock up the crane on SSC.
Here it is opposite the loading bank, which still gives room for the crane to swing around and unload from road vehicles also.The two stiff legs are in the scrub making setting them up a little easier.
The room in the lower part of this last shot will be the unloading area for road vehicles.
So for now I might stop there so I can get a little more done, tick another item off the list. One...there are so many!
Anyway, have a good week,
Oorroo!
Geoff.


I have just built this model and I need to thank you for posting your build photos of this slightly maddening kit. Your photo above of the various metal pieces next to the wood parts was more valuable than all of the kit's instructions! And I don't know how we're expected to differentiate a gudgeon bearing plate from a mast bearing plate based on that tiny diagram...
ReplyDeleteIf you're interested in checking out my in-progress build I have a couple of photos in a thread here: http://model-railroad-hobbyist.com/node/30619#comment-351471
Thank you again for your incredibly valuable photos!
Wow1 I’m sorry i missed this comment, about five years ago, my apologies. Things have moved on quite a bit since then, thanks for your comment. It was great looking back at this post. All the best,
DeleteGeoff.