Monday, April 9, 2012

SSC layout track plan... so far

The Blog lists I follow are all about the passing on of information. A new part of that for the Blog writers is the ability to look at the 'stats' of the blog you write. So to satisfy the blog readers out there who've been searching for my home layout plan, here they are.
 The first drawing of the layout was all about trying to get some of the basic ideas of the layout on paper. I wanted to create a layout that didn't have me working for years and not seeing much progress. The way to solve that was to have as small a layout as possible whilst still meeting the other requirements of the plan. In no particular order:

  • I wanted something easy to transport that included the loading/unloading and setup of the layout, to be comfortable for two people.
  • Layout needed to have some interest on each side for operators and the viewing public.
  • The rail system to be 'in' the environment not 'on' it
  • The viewing to be on at least two sides, but ultimately three sides.
  • The track plan to be simple and still enable the operators to have some fun.
  • The layout to be single track Branch line of the 'pioneer' style (that being simple basic structures and equipment).
  • The track work to be hand laid and follow NSWGR concepts.
  • The operation of points to be mechanical to stop any possible 'wiring' issues ( K.I.S.S.)
  • The area of the layouts environment to be wet, not dry, heavily vegetated, not sparsely.
  • The layout to be DCC
  • The layout to eventually be steam era, and early years also. As the kits and scratch built projects are completed.


The first plan was the initial concept plan, without any restraints like radius size, siding length, turnout size or actual angle of track divergence. The second one has had some extra thought put in. Rather than just the ramblings of someone whilst drinking T'ba coffee. There is also some extra thought as to names and history of the second plan. There is also some thought as to it's reason for being there, the town names, how they began, founding people, you get the idea.
The next two are really to enable me to explain to H just what I was trying to do. I wanted to illustrate how the modules would look, how the landscape would change. I also wanted to record the ideas that I'd had because they change over time and it is great to look back and see just where it started. 

I do struggle with sketching, but at least you get the idea. You can see the name also, spotted out on the road heading to the New England Model Railway Club's Ebor Convention years ago now, was it 2006? I'm sure someone will let me know! There is talk of another on e this year in Armidale, would be great if that one goes ahead, wouldn't miss it!
From all the drawings one thing is clear, that the initial idea has stayed pretty well the same all the way along. There has been some changing of some of the sidings use and the landscape has had to change the way the track worked it's way through the scene.
Thats probably enough for this post and should keep the blog searchers happy.
have a good week,
Oorroo,
Geoff. 

Friday, April 6, 2012

Shrubbery

Things of a leafy nature are on the job list at the moment. I've sprayed some roots from one of my unsuccessful plantings in a couple of tones of grey and a bit of brown. A while back I purchased some gear from 'Treemendus' in the UK ( on my suppliers list) just to give them a go. I particularly like a product that they supply that is actually used in wig making. They suggest it as useful for fine branches, bushes and the like. So I gave it a go.

 Please excuse the poor photography, I was in a bit of a rush, you know squeezing  the modelling between other events of the day. The photo below shows my new hair... well maybe a lighter shade would be better. All I did was spray the roots with a matt adhesive spray then I cut off a piece of wig about 25mm long and teased it out. I put it on the roots, then gave it another spray then on with some ground foams.
 I don't mind how they came up, as some scrubby overgrown stuff they seem ok. I do need to trim them up and tease them out a little. I'll leave them to dry tonight and then give them a touch up tomorrow. I like the wig, might have to try some on some trees next!
Happy Easter, Oorroo!
Geoff.

Sunday, April 1, 2012

Just a couple of weeks to Moree!

A while back I mentioned that there was a show being presented by the New England Model Railway Club in Moree. The Show will be held over the weekend of  the 21st & 22nd of April, yep just twenty days to go.
Darren and I were at the last show held by the NEMRC at Inverell, with Darren's layout 'More'. We had a great time, everyone mixed so well, and we were well taken care of. The layouts were excellent, a top weekend. 
So with the Moree show arriving so quickly I suppose I'm getting a little excited and inquisitive. Just what layouts will be there? What shops? Will many make the trip? Will I be able to park the trailer? You know all the important questions.
If you're planning on going, let me know and we'll look out for you. Darren, Brendan and myself will be there...can't wait.

Tuesday, March 27, 2012

Mock up of Water Tank placement

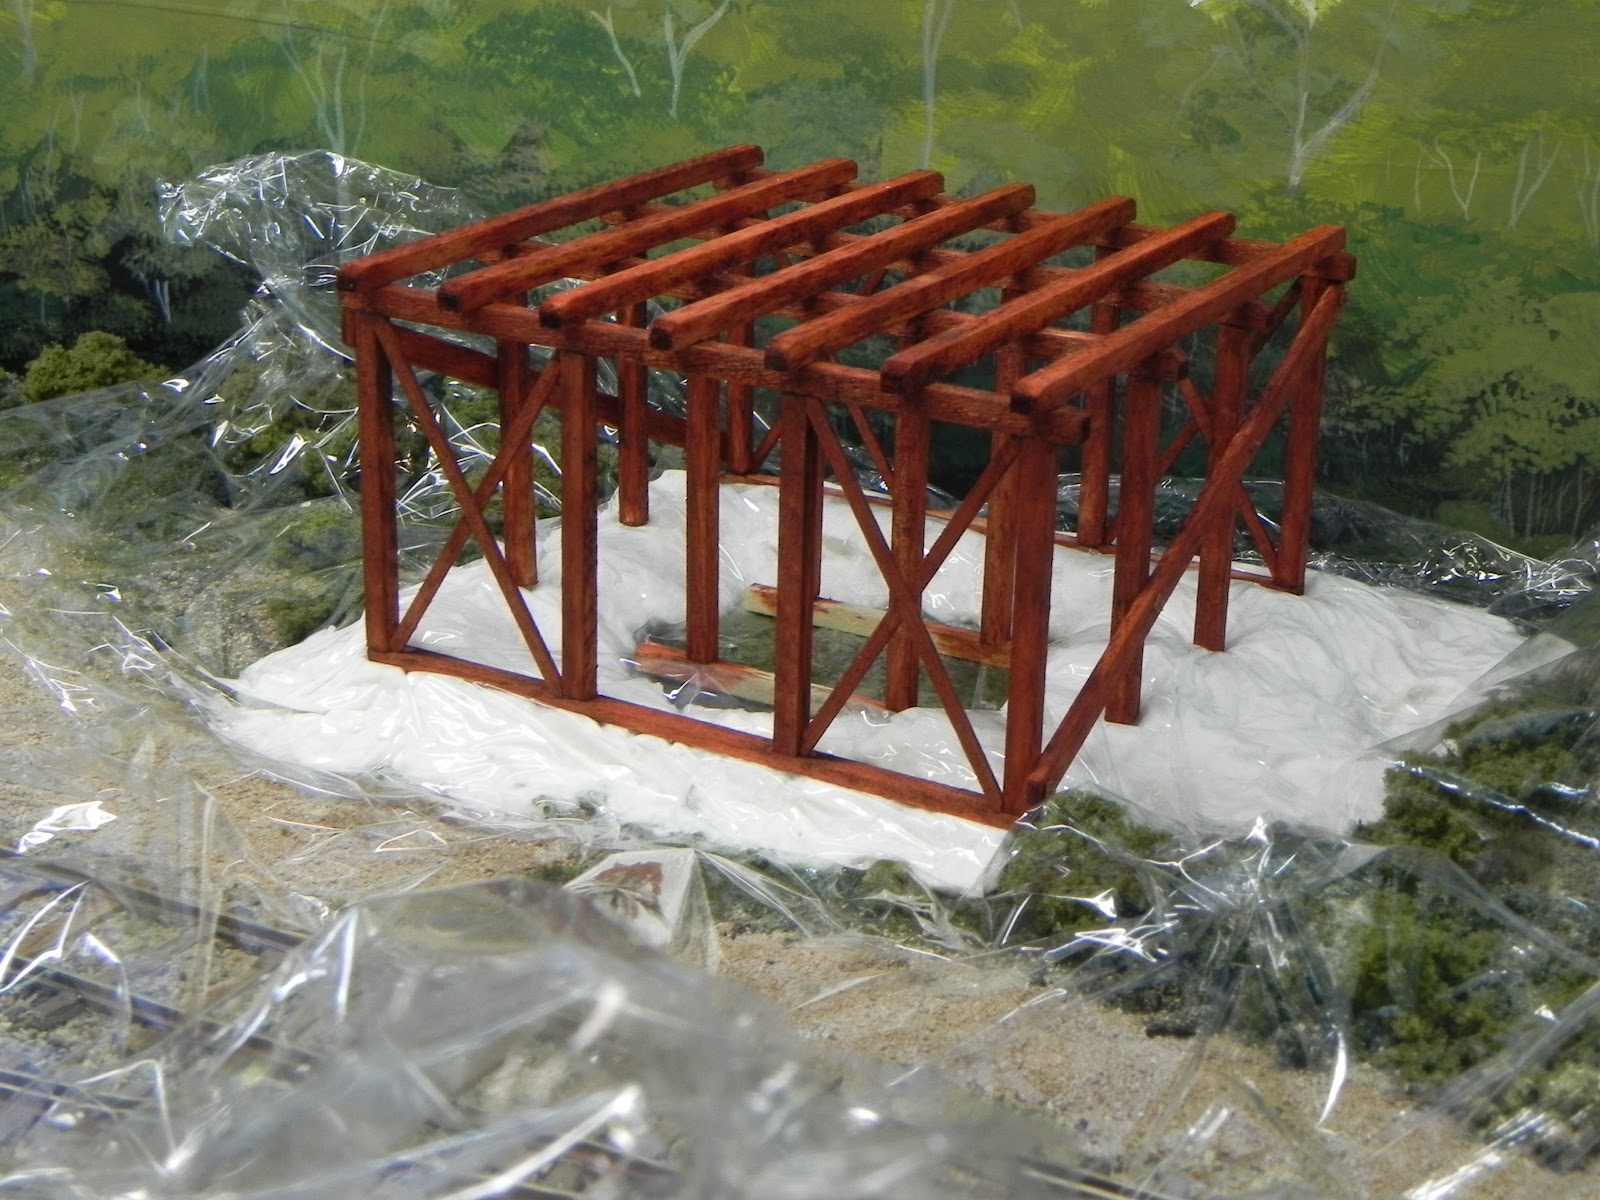
Now that the ground work is nearly dry I placed the stand and its tank in place to see how they work. I've finished the cross bracing on the tank stand and added the bolt detail. Depending on how it settles into the ground area it might get a little more dirtying up, so we'll see how it goes once the 'snow' has been covered. 
The tank is one of the Casula ones, cut down and with some basic bracing put in place. The inside is still to be painted and 'water' added, and weathering/rusting of the exterior as well. The bracing does not go to the floor as it will be covered by the water.
 The next shot is just the ground without the stand to show you the finish up of the previous post showing the plastic removed.


Next it's out with the paint and dirt stuff, the fun part I think. There's also the piping and access ladder to put in place, but nearly there!

Oorroo!
Geoff. 

Sunday, March 25, 2012

Evans Gap Water Tank Stand

The water tank stand has almost reached the stage of locating it on the layout. I used basswood for the stand, 'jarrah' wood stain and some G/W dark flesh paint to colour it up. I was trying to get the 'red oxide' look about it as was used everywhere in NSW.

The first photo shows the basswood before the dark flesh paint was applied. The jarrah woodstain is used so that not so much paint needs to be applied. See the fantastic 'jig' I've used in this shot, think I should patent it!  

The second photo has the stand located on the layout. It also is a little redder as well with the extra paint now applied. You can probably see the cling wrap underneath it. I put down some sculptamold first shaped roughly to the shape required. Then I covered it with the cling wrap,  placed the stand on top pressing it down into the sculptamold so that it was shaped around the base of the stand. 

Off with the plastic and now it's time to wait for it to cure. Once it is I'll do the same in the centre, but removing the two horizontal feet that I put on to site the tank on a flat surface.


Just a quick post this week, 
Oorroo! Geoff.